

Like at lot of people, I have always wanted an original 50’s Fender Tweed amp, but the price tag has always scared me off as they sell for $3,000 upwards depending on condition.
Recently I fell in love with a new amp from Fender called the Pawn Shop Excelsior that has the twang and vintage feel I was after, at a very reasonable price of around US$500. However, sourcing one of these limited edition amps in Australia turned out to be near on impossible (at the time) other than waiting for a used one to pop up on eBay, and I couldn’t wait that long as Ricmedia Guitar was in need of more lessons asap (Fender have since re-commenced supply of this stellar amp btw).
I then started to look for clone kits that I could make myself from places like MojoTone and TubeDepot which supply a range of top notch Tweed clone amp kits, but after choosing all the options I wanted, then adding shipping to Australia where I live ($250+) I got cold feet when I saw the total ($1,700) and decided to rethink the whole idea.
Then I started to think: how about making my own amp cabinet myself based on the Excelsior specs, with a vintage Tweed look, then find a nice tube amp head to match up with it? I have made speaker boxes previously so that’s no biggie, but I hadn’t covered one with the tweed material before or made a speaker grille either. I wanted to at least price the idea, which turned out to be very reasonable, and wouldn’t take too long to complete. I decided that this is the way to go and began sourcing the gear I would need to make it happen.
Amp specifications
Speaker
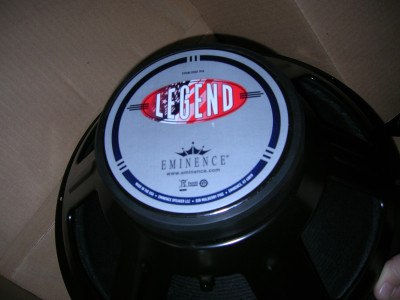
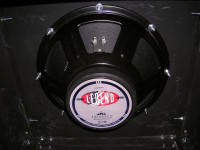
I needed to find out the specs of the Excelsior amp which I found on Fender’s website (duh), and the main piece of information I was after was the speaker. The only clue Fender gives away on their website is “8-ohm 15″ Special Design Speaker” and searching Google images I obtained further that it is “A product by FMIC” which is an acronym for Fender Musical Instrument Corp, no help really. Unfortunately I was unable to find out if the speaker is OEM (made by another company like Eminence, Webber etc) or actually made by Fender.
I decided to source a speaker that would fit the bill, and after looking at quite a few contenders, settled on the Eminence Legend 1518, 15″ 8-ohm speaker which is an excellent speaker, close to what the Excelsior has and will give me that “big amp” sound & twang I want.
I finished up sourcing directly from the Australian distributor (Cecere’s Music) who also run a large retail store in Adelaide, for AUD$160 delivered, which I thought was the bargain of the century 🙂 For U.S readers try Sweetwater.
Tube amplifier
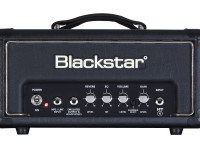
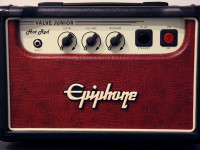
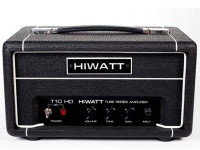
I wasn’t really fussed with sourcing the exact same type of amp that the Excelsior has (which would be near-on impossible anyway) and in fact it left me open to choose any type of amp sound I wanted, so long as it matched the 15″ speaker, but I was constrained by budget so price was an issue. I looked at the Blackstar HT-1RH head, the Epiphone Valve Junior and Valve Senior, HiWatt T10 head and the Mooer Little Monster AC which is a VOX AC30 clone.


I did the usual approach of listening to reviews on YouTube and other sites which helped immensely and gave me a good idea of how each amp sounded, but not through my own 15″ Eminence speaker, so I just had to trust it would work out.
The Blackstar HT1RH sounded more like a metal amp to me, very smooth, high gain (for a tube amp) but lacking any character or uneven break-up which is my personal preference. If I were a hard rock/heavy metal player it would be perfect, but not for Blues.
Next amp is the Epiphone Valve Junior which has gained a reputation as a sought after Blues amp (even more so since they discontinued making it). There are some new Hotrod versions available from shops, otherwise you’re looking at used. I did find several reviews stating that the Valve Junior is a roughly built, rudimentary offering, and some of the videos I watched confirmed that. I was so close to buying one of these but was turned off by the quality issues.
The Epiphone Valve Senior didn’t have many videos or reviews for me to form any real opinion however, considering it is made in the same factory as the Valve Junior I made an executive decision to rule it out, once again on quality issues.
I hadn’t heard any HiWatt amps before so I was eager to here the T10h head in action and I was pleasantly surprised. Very similar to the Blackstar HT1RH but a little more uneven breakup which put this on top of my list so far.
Last but not least was the Mooer Little Monster AC which didn’t have many videos or reviews to go on, but what I did hear was exactly what I was after. On top of that it’s a faithful VOX AC30 clone, an all-time classic British amplifier from the Beatles era (they also make a Little Monster BM which is a Fender Bassman clone). Mooer are slowly gaining a good reputation with their large range of effects pedals so the Little Monster AC was in good company.
Decisions, decisions


I decided to take a chance and buy the Mooer Little Monster AC based on sound and Mooer’s reputation for effects pedals, which payed off in a big way. The sound from this amp head is superb (hear it in the audio further below) even with Chinese tubes, which I later swapped for Mullard 12AX7 and JJ Electronics EL84 with much improvement. It’s a very well built amp too with a heavy gauge metal frame and chrome metal casing that looks cool and comes off easily if you need to replace tubes or repair the amp.
The controls are minimal (which suites me perfectly) consisting of Volume & Gain pots, with Top Boost (as on the VOX AC30) and Thin/Mellow switches too. The voltage is not switchable so if you’re in Australia choose the 240 volt model, and US/Canada the 120 volt model. The speaker-out is switchable between 8-Ohm and 16-Ohm using a standard 1/4″ phono jack but make sure you use heavy gauge speaker wire for this connection, not a guitar lead!
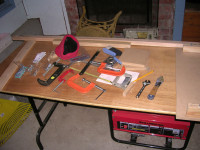
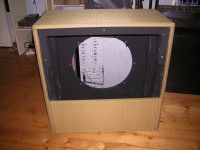
Building the speaker box
As I said in the intro to this article, I have built speaker boxes before but never covered them with tweed material or made an old fashioned speaker grille either, but I am pretty handy with this kind of stuff 🙂
Speaker box size
The Eminence 1518 15″ speaker has dimensions as follows: 15.15″ (384mm) round with a depth of 6.10″ (155mm) and in order to fall in line with the MDF sizes available to me from my local hardware store, the most logical size for the speaker box is: W24″ x H25.5″ x D12″ using 3/4″ thick MDF board (Metric W600mm x H636mm x D300mm using 18mm thick MDF)
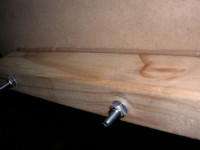
Frame, bolts & glue
For the frame I used standard 1″ x 2″ pine (30mm X 40mm) which worked fine but in hindsight I would have preferred to use a hardwood.
The bolts I used were Zenith brand in several different sizes: 2″ x 3/16″, 3″ x 3/16″ and 3″ x 1/4″ but I swapped out the useless square nuts they provided for some much better lock-tite style hex nuts, and some extra washers too.
Finally, the glue I used is called Liquid Nails and when it dries, it really is as strong as nails (actually stronger in my experience) but don’t get it on your skin or clothes and use in a well ventilated area.
Putting it all together
Once the size was established it is pretty much just logical cuts from then on. I didn’t plan anything really, just measured and cut using the overall dimensions as my guide, not perfect but good enough for me and if there were any small gaps etc then I can just fill them as the amp will be fully covered with tweed anyway.
Just remember to allow for the thickness of the MDF board when making your measurements.


Filling, sealing & painting
Once the box was built and gaps filled I needed to apply sealer and make it somewhat waterproof, then paint it black (pun not intended) with oil based paint before covering with the tweed material (please make sure you paint outside and never in an enclosed area, this stuff is toxic!). I sealed and painted for longevity as I hope this speaker box might be handed down to my son, daughter, niece or nephew so I want it to last a long time.


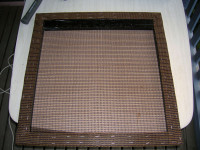
Grille
Next came the hard part (IMO) which is making the speaker grille frame and fixing the grille material (sourced from: hkPartsPipe2011) to it, then covering the whole amp in the tweed cloth. I made the grille frame from hardwood using right-angle brackets and bolts, then stapled the grille material to it on the back of the frame using an electric staple gun, don’t bother with those manual spring loaded staple guns, they are useless and won’t make it into the hardwood.


Gluing the tweed
Before I started gluing the tweed (sourced from: hkPartsPipe2011), I removed all the bolts, otherwise they would cause unsightly bumps on the fabric and I will be putting them back once it’s finished. I used Kiwk-Grip glue for the tweed cloth which worked very well but it is messy, smelly and toxic stuff so be careful and please make sure you do this outside, never in an enclosed area!
I used a piece of painted metal tubing to smooth out the tweed as I went along as well as my hands. I cut the tweed as I went along and of course measured each section. I also ironed the tweed out before I started using a normal hand iron and a water spray bottle. Finally I stapled the tweed on the inside edges and corners to make sure it never lifts.


Touch up paint
After letting the glue dry for 24 hours I touched up the black painted areas on the front and inside to neaten it’s overall look
Finishing touches
Re-bolting
I finished up buying some brand new 1/4″ bolts for the whole amp as I am very fussy with this kind of thing and wanted it to look as good as possible. I again used the Zenith brand bolts but would have liked to use stainless steel hex-key (Alan-key) bolts but just couldn’t justify the $120+ it would cost.
Castors
I had previously spotted a small range of castors at my local Home Hardware and they certainly looked like good quality to me, so instead of buying expensive castors specifically made for the music industry, I just bought these ones which were again Zenith brand and only cost $15 for two pairs. If this box ever goes on-the-road then it will be fully road-cased anyway so the castors won’t have too difficult a life.


Mounting the speaker
I originally used a nail to center the speaker, then used a small piece of wood with a hole equaling the radius and poked a pencil through it, then spun it around to make the circle, basically a home-made compass/protractor type thing as the one I had from school 25 years ago wasn’t big enough 🙂

Chrome corners
I sourced the chrome corners from a eBay seller (GDAUDIO) who offered a set of 8 (not 4 like most sellers) at the right specs and type for my speaker box, specifically 34mm x 34mm x 34mm and a nice chrome finish too as some of the other sellers offerings didn’t look too good to me.
Leather handle
Again it was eBay to the rescue from a seller (ALLPARTSPIPE) offering a nice real leather handle made to the original specs and when it arrived I was very pleased with it too.
Speaker jack setup
For the speaker jack I made a hole about 3″ wide using a hole-saw drill bit before covering with tweed, then I mounted a metal plate and mounted the 1/4″ phono jack to it, offset to allow for right-angled plugs. I then wired it up using heavy gauge speaker wire.


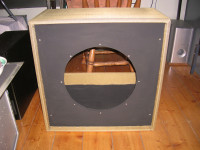
Final result
The look
I am exceedingly happy with the aesthetics of the speaker box and amp, and considering it was my first time working with tweed material I think I did pretty well. I also customized the Mooer Little Monster AC amp head to my liking with a “Hotrod” chrome badge in place of the original Mooer nameplate, and I also replaced the gain and volume knobs with some crazy chrome skulls just for fun, love all that chrome stuff 🙂


The sound
Blown away would be the most apt term to describe my impressions of the sound from the combo of Eminence 1518 speaker and the Mooer Little Monster AC amp head. Beautiful uneven break-up, smooth twangy tone with some serious bottom end too and the perfect basis to add a nice distortion pedal like BOSS DS-1, Marshall BluesBreaker I/II, Ibanez Tube Screamer or other decent pedal, as just relying on tubes for your sustain/distortion while soloing is just too hard on the hands.
For a rhythm sound I would just go AL-la-natural straight into the amp with no effects or distortion pedals etc, it’s just perfect the way it is.
For the sound sample below I had the following setup:
- I used no effects or pedals of any kind on the signal line, just straight into the amp
- Gain was on 10 on the amp and volume at about 2
- I played my red Strat which has Texas Special pickups in it, set on neck/middle, volume on 10, tone on 10
- I recorded it using a pair of Behringer C4 mics onto a stereo track in Audacity
- I added a touch of delay in Audacity to fill it out a little, and some phaser half way through, but nothing else
- I will be posting some more audio/video samples with and without distortion pedals and effects over the next few weeks
Little Wing
In conclusion
The whole project cost me around the $900 mark which I think is well worth it as I got to choose exactly the parts I wanted. It also had the added bonus of being original as not many amps nowadays have 15″ speakers matched up with an AC30 clone. The sound sample above is the most raw sound out of the amp, and considering the raw sound out of some very expensive amps out there I think I am way ahead. All I need to do now is add a nice distortion pedal, some reverb or tremolo and chorus for clean sound and I am all set.
I would love to hear your comments on this post so be sure to leave them below and I will answer any questions you have.
Cheers!
Richie Brereton

Loved this article! Question: a la the old ampeg b-15 amp, what are your thoughts concerning a removable “dolly” so you could place the amp on the floor for better bottom?
Hi Steve, glad you liked the article mate. The Ampeg B-15 is some serious speaker! I checked it out and wow, that would be an amazing box. Regarding removal of the dollies, I don’t think it would be necessary as the 15″ speaker will give you tons of bottom end, but it is something you could try and see if it does work, if not them pop them back on.
Cheers!
Richie
Hi, I did a custom box with a Eminence Legend 1218 speaker. Upgraded the tubes in the little monster with a early 60’s GE power tube and a Sovtek 12AX7LPS preamp tube with a Boss DS-1 pedal. Sounds very good and can get just about any sound i’m looking for with this home setup. I’ve used Ampeg B-15 speakers and they are the bomb..
Hi Gary, it’s a killer setup eh! Such smooth tone and wide variety of sounds 🙂 cheers mate! Richie
Hi Richie,
Very nice work. I have a funny request. I’m trying to repair a mooer little monster ac but I can’t get the schematic. Mooer will not supply it. All I need is some close up photos of the circuit which will show me the value of the volume to filter cap resistor which burnt beyond recognition and close up of the traces near the 2 volume pots. I realize this is a strange request which you may not be comfortable accomodating but I thank you for your time anyway.
Manny G
Howdy Manny, It’s a big job to get a top view of the circuit board mate but I can give you some tips. The Little Monster comes in two flavours: the AC which is based on the VOX AC30 circuit, and the BM which is based on the Fender BassMaster circuit. So whichever version you have, just lookup the schematic for it and it will be the same value I would say and if not, would likely work anyway. Click the links for schematics of AC30 and BassMaster.
Cheers!
Richie
Hi Manny,
even it’s a 8 year old post I’ll give it a try.
Have you managed to repair you Little Monster.
I have the same problem, they don’t supply the schematic, what a bummer, due it’s not a real secret.
On my AC the power transformer is shortet and they supplied me a new transformer but no schematic 😁
On my BM i try to add an FX Send/Return. Do you have any idea were to add it, normaly it’s after the tone stage to the power stage of the amp.
Or could you source a schematic at the end?
Best wishes from Germany 🇩🇪
Ralph