This lesson is an in-depth look at bends, slides and trills which are like condiments for a guitarist, they add color, dynamics and depth to even the most basic riff or solo. This is quite a long lesson so you might want to view it over several days depending on your playing level. Initially I would not worry about using a metronome and play these riffs and examples free-form until your comfortable with them, then start using a metronome.
Contents
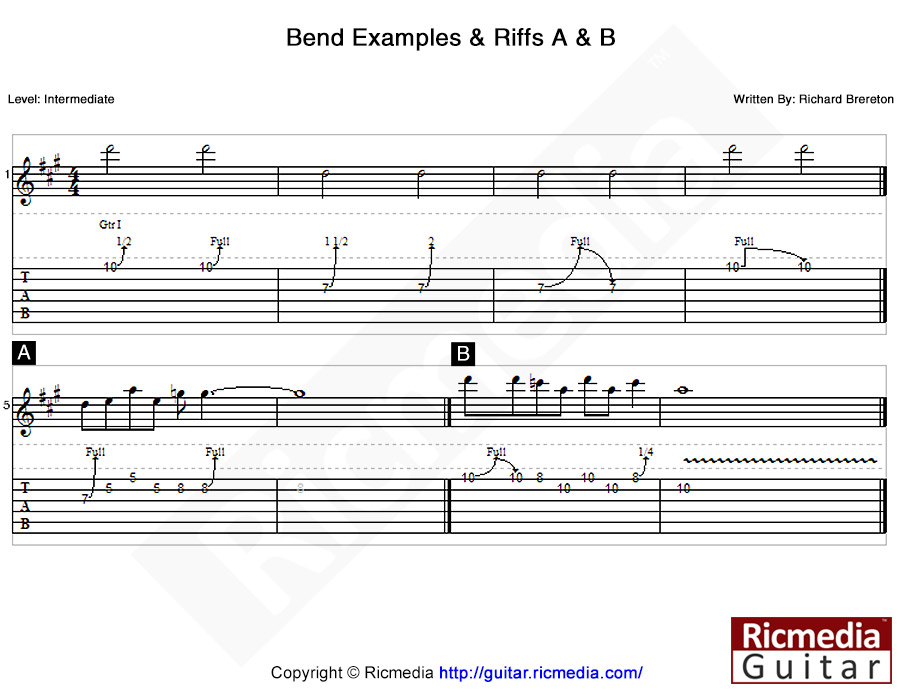
Bends
You’re bound to get sore fingers practicing this part of the lesson, but don’t worry, it’s completely normal. Bending strings changes the current note to a higher note, these can be as little as half a semitone (quarter-tone) and up to 3 tones (although I personally can’t get past 2 tones). We will be exploring four types of standard bends: half or semitone, Full or tone, one-and-a-half or tone-plus-semitone, 2 tone bends. I will also show you bend and release and ghost bends (or pre-bends). Some general tips before we start the examples; when bending strings 1, 2 or 3 (the skinniest strings) we usually bend in a upwards fashion, and when bending strings 4, 5, and 6 (the thickest strings) we usually bend downwards towards the floor, this ensures the strings don’t come off the fretboard (although Steve Vai uses this as a trick).
Half bend
let’s now look at the bend examples in the tablature sheet below or take a look at the video, starting with the half bend using your third finger and backing up with your second and first fingers, start to practice the bend. The note/tone your are bending to is the next note up on the eleventh fret, so make sure after each bend you reference this note so you know if you are bending the right amount.
Full bend
Now move onto the next example which is a full bend or tone (two notes up) and is a lot harder than the first, but keep practicing and make sure you always backup your bending finger with any fingers underneath. For instance; this bend you would use your third finger and backup with your first and second fingers.
One-and-a-half bend and two-tone bend next are optional and quite hard, so if you are new to bending then perhaps skip these two for another time, if your experienced then start bending! Remember to backup with other fingers and keep pressure on the fretboard as you are bending otherwise your finger will slip under or off the string (this sounds awful and can hurt btw).
Bend & release
Now onto the bend & release which is simply a normal bend and hold, then release back to the original note, make sure you keep the speed of the bends consistent, in other words the time taken to bend up should be the same time taken to bend down.
Ghost bend
A ghost bend or pre-bend is notoriously difficult but don’t let that deter you! You will need to guess how far to bend the note upwards silently, then pick and release the note down to the normal tone (make sure you check out the video for this one).
Blues bend riffs
These are both blues/rock favorites and should be in any good guitarists arsenal. In riff A there are two points to be careful of, (1) the first note is a full bend, then you fret the second and first strings with your first finger (check out the video) and (2) the last bend you need to accomplish with your fourth finger, make sure you backup with all your other fingers for this one otherwise you may not make the pitch. In riff B the only point to look out for is the quarter note bend, this is a very subtle, barely noticeable bend. Once you fingers are sore enough, it’s time to move onto the next part of this lesson.
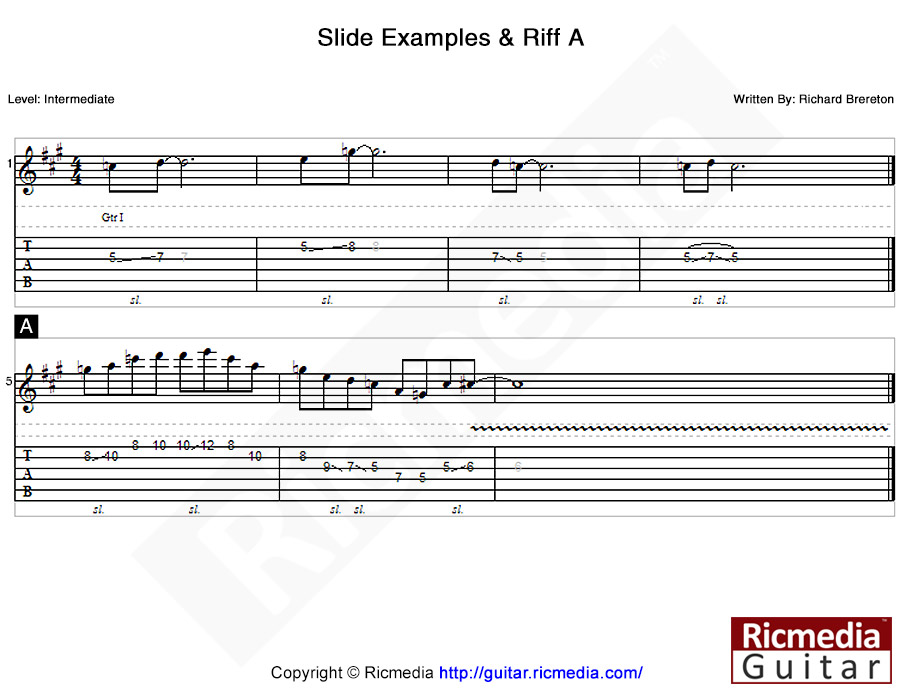
Slides
Two note slide
Into the world of slides now and first up is a basic two note slide from the fifth to the seventh fret (third string), in the video example I use my second finger but in practice you will need to use whatever finger suits the riff or solo your are playing, so practice sliding with all your fingers.
Three note slide
Next up is a three note slide and the reason I give this example is to help you practice sliding more than the standard two notes, in fact you will need to be able to accurately slide from as many as twelve or more frets and stop “dead on” one note, sounds easy but it isn’t. Once again practice this slide using all your fingers.
Down slide
Onto the next example which is a slide down from the seventh to the fifth fret (third string) and should be pretty straight forward.
Up and down slide
The final example is a slide up, then down to the original starting point, once again you will need to be accurate here so take it slow, and gradually build up speed.
Blues slide riff
This is a blues lick I made up with a number of slides and a nice resolution to the major third. Some points to watch in this riff are: the triple slide on the third string can be tricky, so feel free to change the second slide to a pull-off if you find it too hard, second point is the last slide from the fifth to the sixth fret (third string) try and do this using your first finger with a nice vibrato afterwards.
Trills
Now for the last section in this lesson, trills. A trill is simply a rapid alternation between two notes, but most often it is between two adjacent notes one semitone apart, for instance, between the notes C and C♯. In the world of guitar (and in this lesson) we will also trill between a tone and a tone-plus-semitone, or C–D and C–D♯.
One-note trill
The first trill is between frets five and six (third string) so you might want to watch the video to get an idea of how it sounds. It will take some time to build up speed and stamina so don’t be disappointed if you can only trill for five or ten seconds, just keep going for five seconds after your hand starts to ache, this will build up strength faster than any other way.
Two-note trill
Onto the next example which is a two note trill between frets five and seven (second string), make sure you use your first and third fingers for this one.
Three-note trill
Onto the next example which is a three note trill, make sure you use your first and fourth fingers and once again, don’t be disappointed if you can only trill for a short time, patience and practice.
Blues trill riff
This is a simple blues lick that resolves to the major third using a trill, points to look out for in this riff are: the first bend which is a bend and release so make sure you have read the first section of this lesson, second point is that the riff is in triplets, lastly make sure you use your first and second finger to perform the trill.

Summary
This has been a long lesson and I hope you enjoyed it, no doubt you will have to come back a number of times to complete the whole lesson, remember that the techniques we learn here are ongoing throughout your playing life and may change according to style changes.
Cheers & enjoy!
Leave a Reply